
A product configuration encapsulates a set of packages and components required
to support the target user experience on the underlying hardware. Each product
configuration declares its default list of packages using their GN labels in a
GN import (.gni) file. You can augment the contents of the current build
configuration in a few different ways.
Dependency sets
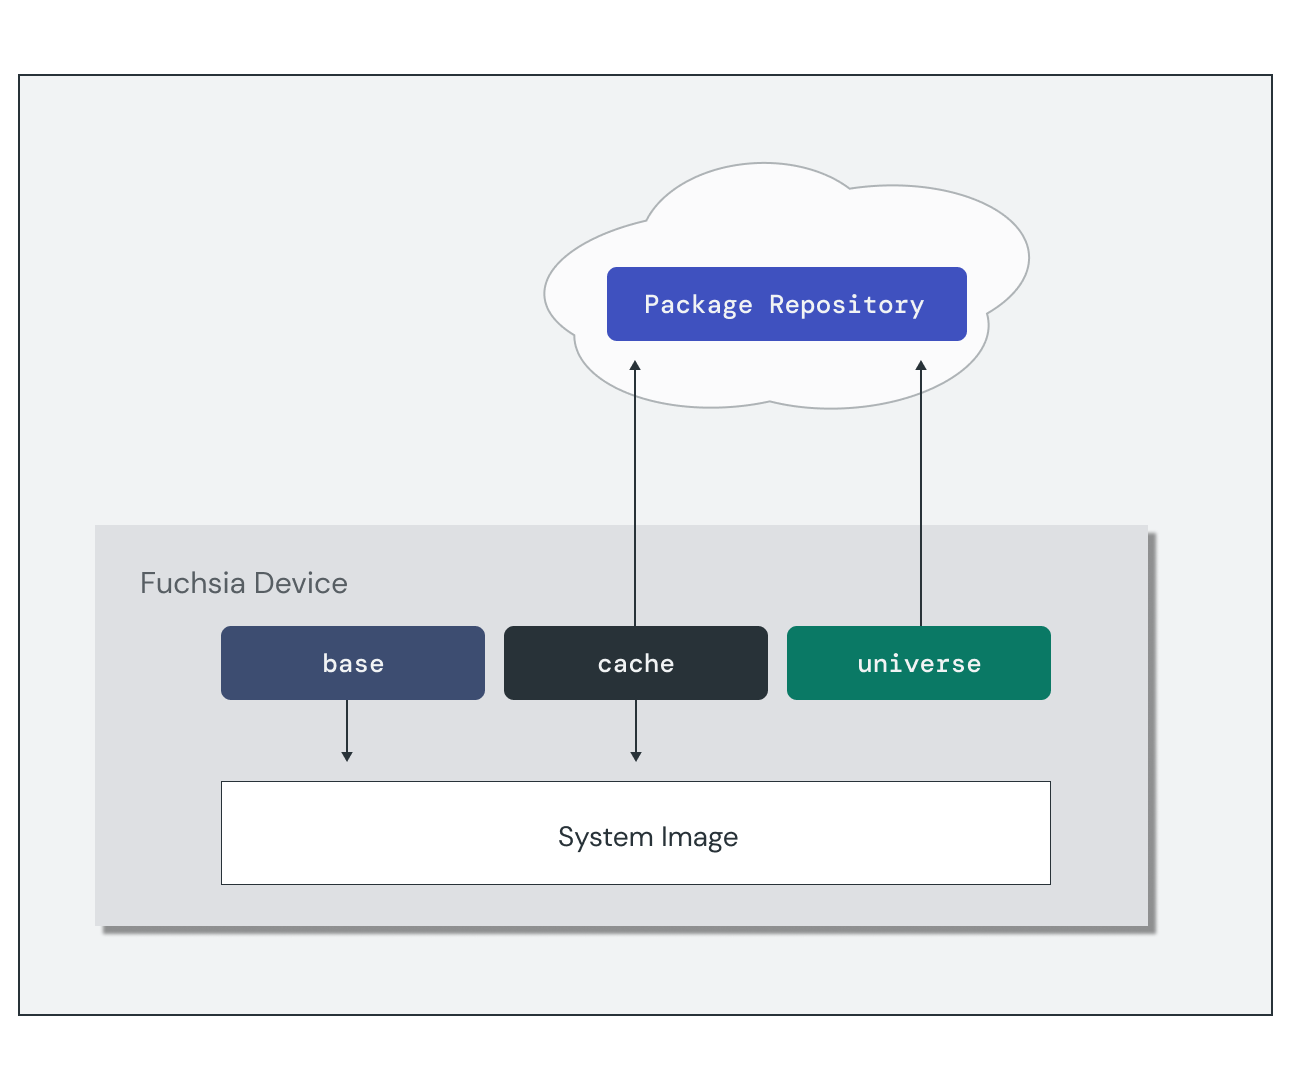
Packages in a build configuration are assigned to one of three dependency sets:
- Base: System-critical packages bundled into the system image. Base packages always resolve to the version in the system image, even if a different version is available from a package repository. Updating a base package requires a system (OTA) update.
- Cache: Additional packages bundled into the system image. Cached packages are updated from a package repository if a different version is available.
- Universe: Everything else. This set of packages is only available through a package repository and delivered on demand.
Below is an example snippet of a product configuration file. This product
inherits all the packages defined in the core product, and then adds a
few additional packages to each dependency set:
import("//products/core.gni")

legacy_base_package_labels += [
  "//src/chromium:web_engine",
  "//src/fonts",
]

legacy_cache_package_labels += [
  "//src/media/playback/bundles:services",
]

discoverable_package_labels += [
  "//src/ui/examples:bouncing_ball",
]
In this example the build system would package the runtimes, resources, and services into the disk image for the target device. The examples would only be available on demand from a package server.
Manual build customization
Creating a new complete product configuration is not the only way to customize
the build. You can also provide additional labels to the fx set command using
these flags:
--with: Add a target label to the universe dependency set.--with-base: Add a target label to the base dependency set.--with-cache: Add a target label to the cache dependency set.
This is a good way to temporarily enable packages for development that you don't
want to include in the final build target, such as tests. For example, the
following command adds all the packages in the Fuchsia tests bundle to a
standard workstation_eng build.
fx set workstation_eng.x64 --with //bundles/testsDeveloping with packages
Recall from the introduction that Fuchsia packages do not "install" to a device, they resolve from the local package cache or a package repository. When developing Fuchsia software, this means that testing your code involves the following steps:
- Build an updated package with any code changes.
- Publish updated packages to a package repository.
- Trigger an update on the target device.
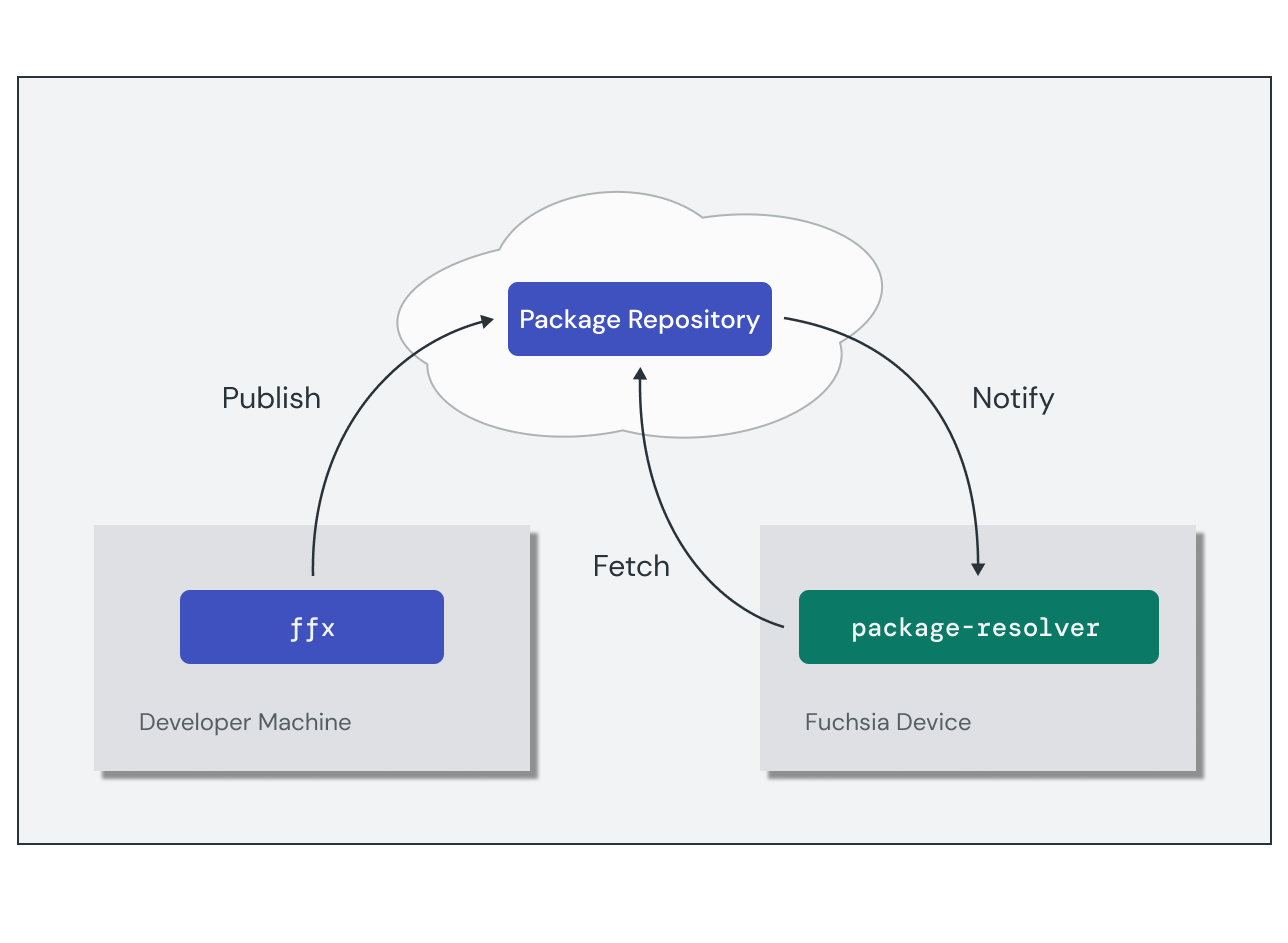
Developer tools such as fx build publish package updates to a local package
repository as part of the build process. The dependency set where your
product declares the package determines how to trigger the update on the target
device:
- Base packages can only be updated by performing a whole system update (OTA).
Trigger a system update using
fx otaor flash a new system image on the device to update base packages. - Cached and universe packages update automatically the next time the package is resolved.
Exercise: Customize the build
In this exercise, you'll customize the workstation_eng build by temporarily
including additional packages in the universe package set — making them
available to the target device.
Add packages to the build
You can bundle additional targets with your build configuration using the
--with flag of fx set. Reconfigure your workstation_eng build to include all
the Fuchsia examples:
fx set workstation_eng.x64 --with //examplesThis is commonly used to include test packages you need to run on the device or a new package you may be working on that isn't yet included in a product configuration.
Verify that the example packages were added to the build:
fx list-packages exampleExplore build targets using GN
GN comes with a powerful set of diagnostic tools that allow you to examine the
targets configured in your build. Follow along to discover how to use fx gn
subcommands to explore the build targets.
Begin by using the desc command to print details about the //examples
bundle you just added to the build.
fx gn desc out/default //examplesThis command prints details about the target type and all its dependencies. For
the //examples bundle, the dependencies list represents the individual
example packages added to the build.
Explore the details of the hello-world target using the same command.
fx gn desc out/default //examples/hello_world:hello-worldThis target represents a package containing multiple components, so you will see additional dependencies such as component manifests and package metadata.
Go down one more level to explore the hello-world-rust component.
fx gn desc out/default //examples/hello_world/rust:hello-world-rust-componentFrom the perspective of a specific target, such as the hello-world-rust
component, you can also look upwards in the build graph using the refs command.
This reports the incoming references to the given target.
fx gn refs out/default //examples/hello_world/rust:hello-world-rust-componentFinally, use the path command to report the reference chain between any two
targets. This can be useful to determine where and how your target is included
in the build at all by checking the reference path between your target and
//:default.
fx gn path out/default //:default //examples/hello_world:hello-worldRun the example in the emulator
Run fx build again to build the updated packages:
fx buildUse the ffx component command to run a Hello World component example:
ffx component run /core/ffx-laboratory:hello-world-cpp fuchsia-pkg://fuchsia.com/hello-world-cpp#meta/hello-world-cpp.cmOpen a new terminal window and filter the device logs for messages from the example:
ffx log --filter helloYou should see the following output in the device logs:
[hello-world-cpp][I] Hello, World!
Exercise: Create a new build product
In this next exercise, you'll encapsulate these additional packages into a new
product configuration that extends workstation_eng.
Declare the product configuration
Create a new directory under //vendor called fuchsia-codelab:
mkdir -p vendor/fuchsia-codelabCreate a new file fuchsialab.gni under //vendor/fuchsia-codelab/products
with the following contents:
# Extend the workstation_eng product
import("//products/workstation_eng.gni")
This creates a new product called fuchsialab that extends workstation_eng,
inheriting all the package labels it defines.
Verify that the build system recognizes your new product with the
fx list-products command. You should see fuchsialab in the product list.
fx list-productsAdd packages to your product
To customize the specific packages included with your product, add them to the labels for the appropriate package set in your product configuration.
Add the following lines to //vendor/fuchsia-codelab/products/fuchsialab.gni
to include the Hello World example in your custom product:
discoverable_package_labels += [
    "//examples/hello_world",
]
Build your new product
Reconfigure the build for the fuchsialab product, running on the FEMU board:
fx set fuchsialab.x64Verify that the Hello World example package is now part of the build:
fx list-packages helloRun fx build to generate a new image for your custom product:
fx buildRestart the emulator
Run the following command to close any emulator instances you currently have open:
ffx emu stop --allStart a new emulator instance:
ffx emu start --headlessWhen startup is complete, the emulator prints the following message and returns:
Logging to "$HOME/.local/share/Fuchsia/ffx/emu/instances/fuchsia-emulator/emulator.log"
Waiting for Fuchsia to start (up to 60 seconds)........
Emulator is ready.
Inspect the device
Open another terminal window and run the following command to print the details of your device target:
ffx target showLook for the build configuration of the target output:
Version: "2000-01-01T12:00:00+00:00"
Product: "fuchsialab"
Board: "x64"
Commit: "2000-01-01T12:00:00+00:00"
Congratulations! You just built your own custom product based on Fuchsia!