
通訊協定控制代碼是眾所周知的物件,可提供 FIDL 通訊協定的實作項目,並可透過元件命名空間探索。元件架構可協助元件探索通訊協定,能力轉送說明哪個元件應做為任何指定用戶端的供應商。識別適當的元件後,元件管理服務 會使用每個元件命名空間中的控制代碼,在元件之間建立連線。
請參考以下 fuchsia.example.Foo 通訊協定的範例:
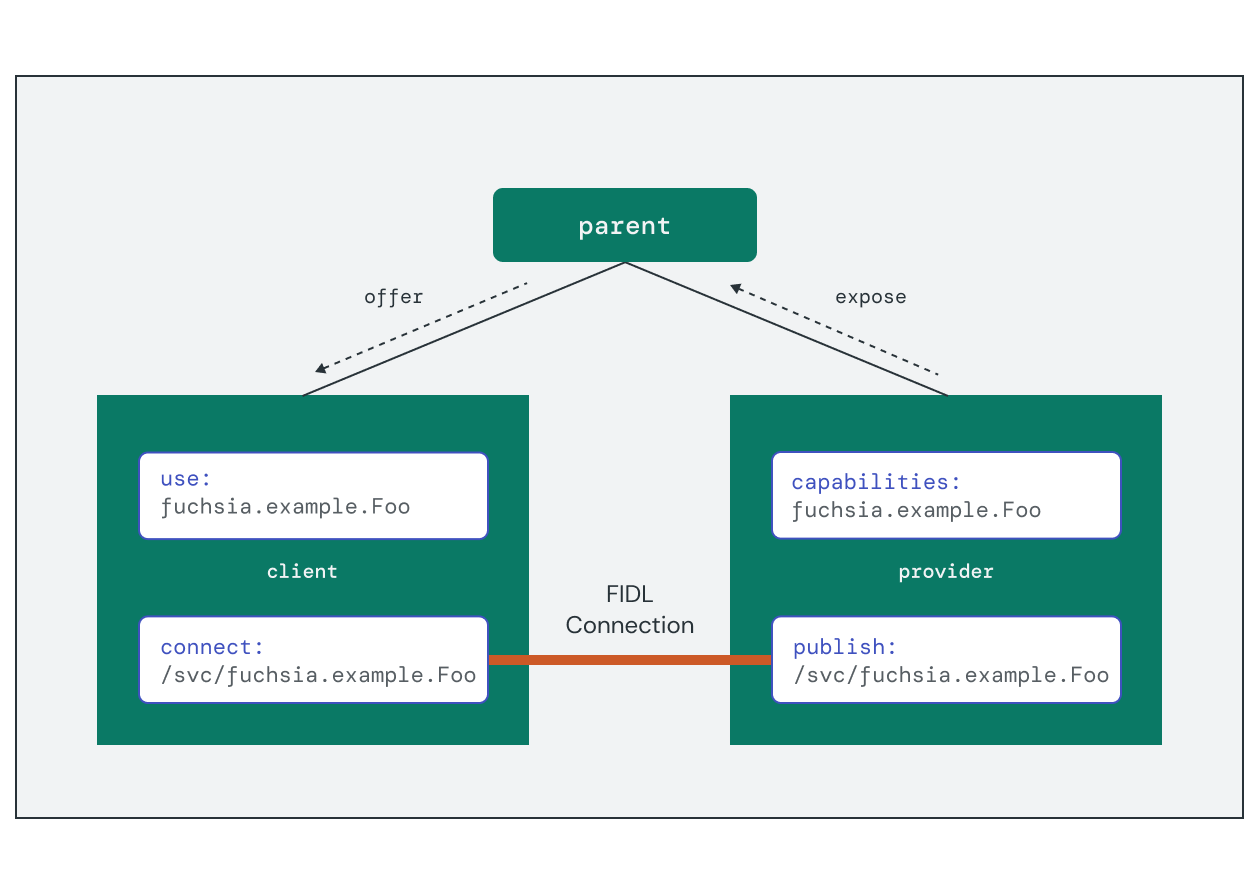
下圖標示連線作業涉及的主要元素:
- 提供者元件會在資訊清單的
capabilities區段中,靜態宣告通訊協定。這會啟用元件架構, 執行能力轉送。 - 用戶端元件會靜態要求資訊清單
use區段中的通訊協定。如果能力轉送成功,這會在用戶端命名空間中建立/svc/fuchsia.example.Foo通訊協定項目。 - 供應商程式碼會在執行階段發布實作項目。這會在供應商的外寄目錄中,於
/svc/fuchsia.example.Foo建立通訊協定項目。 - 用戶端程式碼會在執行階段連線至通訊協定控制代碼。這會開啟與供應商元件中執行的實作項目之間的 FIDL 連線。
發布通訊協定實作項目
實作 FIDL 通訊協定的元件會宣告並公開該通訊協定,做為元件資訊清單中的能力。這樣一來,元件架構就能從這個元件將能力轉送至拓撲中要求該功能的其他元件。
{
    // ...
    capabilities: [
        { protocol: "fuchsia.example.Foo" },
    ],
    expose: [
        {
            protocol: "fuchsia.example.Foo",
            from: "self",
        },
    ],
}
能力轉送說明通訊協定的存取權,但不會建立連線所需的端點。元件必須使用 fuchsia.io 通訊協定,在傳出目錄中以 /svc/ 控制代碼的形式發布實作項目。產生的 FIDL 繫結會包裝這個控制代碼,並讓供應商連結要求控制代碼,開始接收 FIDL 訊息。
荒漠油廠
let mut service_fs = ServiceFs::new_local();

// Serve the protocol
service_fs.dir("svc").add_fidl_service(PROTOCOL_NAME);
service_fs.take_and_serve_directory_handle().context("failed to serve outgoing namespace")?;
C++
// Serve the protocol
FooImplementation instance;
fidl::Binding<fuchsia::example::Foo> binding(&instance);
instance.event_sender_ = &binding.events();
fidl::InterfaceRequestHandler<fuchsia::example::Foo> handler =
    [&](fidl::InterfaceRequest<fuchsia::example::Foo> request) {
      binding.Bind(std::move(request));
    };
context->outgoing()->AddPublicService(std::move(handler));
連線至通訊協定實作
用戶端元件會在元件資訊清單中,將通訊協定宣告為必要能力。這樣一來,元件架構就能判斷元件是否有權存取通訊協定實作項目。如果存在有效路徑,元件的命名空間會包含對應的 /svc/ 控制代碼。
{
    // ...
    use: [
        { protocol: "fuchsia.example.Foo" },
    ],
}
用戶端元件會使用 fuchsia.io 通訊協定,與通訊協定實作項目建立連線並開啟管道。產生的 FIDL 繫結會包裝這個管道,讓用戶端開始傳送訊息給供應商。
荒漠油廠
// Connect to FIDL protocol
let protocol = connect_to_protocol::<FooMarker>().expect("error connecting to echo");
C++
// Connect to FIDL protocol
fuchsia::example::FooSyncPtr proxy;
auto context = sys::ComponentContext::Create();
context->svc()->Connect(proxy.NewRequest());
練習:Echo 伺服器和用戶端
在本節中,您將使用為 fidl.examples.routing.echo 產生的 FIDL 繫結,在 Rust 中實作用戶端和伺服器元件。
啟動模擬器
如果沒有正在執行的執行個體,請啟動模擬器:
啟動新的模擬器執行個體:
ffx emu start --headless啟動完成後,模擬器會輸出下列訊息並傳回:
Logging to "$HOME/.local/share/Fuchsia/ffx/emu/instances/fuchsia-emulator/emulator.log"
Waiting for Fuchsia to start (up to 60 seconds)........
Emulator is ready.
啟動套件伺服器,讓模擬器載入軟體套件:
fx serve
建立伺服器元件
首先,請建立新的元件專案,實作回應伺服器。這個元件會提供 Echo 通訊協定,並處理收到的要求。
在 //vendor/fuchsia-codelab 目錄中,為名為 echo-server 的新元件建立專案架構:
mkdir -p vendor/fuchsia-codelab/echo-server在新專案目錄中建立下列檔案和目錄結構:
荒漠油廠
//vendor/fuchsia-codelab/echo-server
                        |- BUILD.gn
                        |- meta
                        |   |- echo.cml
                        |
                        |- src
                            |- main.rs
C++
//vendor/fuchsia-codelab/echo-server
                        |- BUILD.gn
                        |- meta
                        |   |- echo.cml
                        |
                        |- main.cc
在 BUILD.gn 檔案中新增下列建構規則,以建構及套件伺服器元件:
荒漠油廠
echo-server/BUILD.gn:
import("//build/components.gni")
import("//build/rust/rustc_binary.gni")


rustc_binary("bin") {
  output_name = "echo-server"
  edition = "2024"

  deps = [
    "//vendor/fuchsia-codelab/echo-fidl:echo_rust",
    "//src/lib/diagnostics/inspect/runtime/rust",
    "//src/lib/diagnostics/inspect/rust",
    "//src/lib/fuchsia",
    "//src/lib/fuchsia-component",
    "//third_party/rust_crates:anyhow",
    "//third_party/rust_crates:futures",
  ]

  sources = [ "src/main.rs" ]
}

# Unpackaged component "#meta/echo_server.cm"
fuchsia_component("echo_server_cmp") {
  component_name = "echo_server"
  manifest = "meta/echo_server.cml"
  deps = [ ":bin" ]
}

fuchsia_package("echo-server") {
  package_name = "echo-server"
  deps = [ ":component" ]
}
C++
echo-server/BUILD.gn:
import("//build/components.gni")


executable("bin") {
  output_name = "echo-server"
  sources = [ "main.cc" ]

  deps = [
    "//vendor/fuchsia-codelab/echo-fidl:echo_cpp",
    "//sdk/lib/async-loop:async-loop-cpp",
    "//sdk/lib/async-loop:async-loop-default",
    "//sdk/lib/inspect/component/cpp",
    "//sdk/lib/sys/cpp",
    "//sdk/lib/syslog/cpp",
  ]
}

# Unpackaged component "#meta/echo_server.cm"
fuchsia_component("echo_server_cmp") {
  component_name = "echo_server"
  manifest = "meta/echo_server.cml"
  deps = [ ":bin" ]
}

fuchsia_package("echo-server") {
  package_name = "echo-server"
  deps = [ ":component" ]
}
將 Echo 通訊協定宣告為伺服器元件提供的能力,並公開供父項領域使用:
荒漠油廠
echo-server/meta/echo_server.cml:
{
    include: [
        "inspect/client.shard.cml",
        "syslog/client.shard.cml",
    ],

    // Information about the program to run.
    program: {
        // Use the built-in ELF runner.
        runner: "elf",

        // The binary to run for this component.
        binary: "bin/echo-server",
    },

    // Capabilities provided by this component.
    capabilities: [
        { protocol: "fidl.examples.routing.echo.Echo" },
    ],
    expose: [
        {
            protocol: "fidl.examples.routing.echo.Echo",
            from: "self",
        },
    ],
}
C++
echo-server/meta/echo_server.cml:
{
    include: [
        "inspect/client.shard.cml",
        "syslog/client.shard.cml",
    ],

    // Information about the program to run.
    program: {
        // Use the built-in ELF runner.
        runner: "elf",

        // The binary to run for this component.
        binary: "bin/echo-server",
    },

    // Capabilities provided by this component.
    capabilities: [
        { protocol: "fidl.examples.routing.echo.Echo" },
    ],
    expose: [
        {
            protocol: "fidl.examples.routing.echo.Echo",
            from: "self",
        },
    ],
}
導入伺服器
開啟主要來源檔案,並將匯入陳述式替換為下列程式碼:
荒漠油廠
echo-server/src/main.rs:
use anyhow::Context;
use fidl_fidl_examples_routing_echo::{EchoRequest, EchoRequestStream};
use fuchsia_component::server::ServiceFs;
use fuchsia_inspect::component;
use fuchsia_inspect::health::Reporter;
use futures::prelude::*;
C++
echo-server/main.cc:
#include <fidl/fidl.examples.routing.echo/cpp/fidl.h>
#include <lib/async-loop/cpp/loop.h>
#include <lib/async-loop/default.h>
#include <lib/fidl/cpp/binding.h>
#include <lib/inspect/component/cpp/component.h>
#include <lib/sys/cpp/component_context.h>
#include <lib/syslog/cpp/log_settings.h>
#include <lib/syslog/cpp/macros.h>
在 main() 中新增下列程式碼,以提供 Echo 通訊協定:
荒漠油廠
echo-server/src/main.rs:
// Wrap protocol requests being served.
enum IncomingRequest {
    Echo(EchoRequestStream),
}

#[fuchsia::main(logging = false)]
async fn main() -> Result<(), anyhow::Error> {
    let mut service_fs = ServiceFs::new_local();

    // Initialize inspect
    component::health().set_starting_up();
    let _inspect_server_task = inspect_runtime::publish(
        component::inspector(),
        inspect_runtime::PublishOptions::default(),
    );

    // Serve the Echo protocol
    service_fs.dir("svc").add_fidl_service(IncomingRequest::Echo);
    service_fs.take_and_serve_directory_handle().context("failed to serve outgoing namespace")?;

    // Component is serving and ready to handle incoming requests
    component::health().set_ok();

    // Attach request handler for incoming requests
    service_fs
        .for_each_concurrent(None, |request: IncomingRequest| async move {
            match request {
                IncomingRequest::Echo(stream) => handle_echo_request(stream).await,
            }
        })
        .await;

    Ok(())
}
這段程式碼會執行下列步驟,提供 Echo 通訊協定:
- 初始化
ServiceFs,並在傳出目錄的/svc/fidl.examples.routing.echo.Echo下方新增項目。 - 提供目錄,並開始監聽連入連線。
- 將
handle_echo_request()函式附加為任何相符Echo要求的請求處理常式。
C++
echo-server/main.cc:
int main(int argc, const char** argv) {
  async::Loop loop(&kAsyncLoopConfigAttachToCurrentThread);
  async_dispatcher_t* dispatcher = loop.dispatcher();

  // Initialize inspect
  inspect::ComponentInspector inspector(loop.dispatcher(), inspect::PublishOptions{});
  inspector.Health().StartingUp();

  component::OutgoingDirectory outgoing_directory = component::OutgoingDirectory(dispatcher);
  zx::result result = outgoing_directory.ServeFromStartupInfo();
  if (result.is_error()) {
    FX_LOGS(ERROR) << "Failed to serve outgoing directory: " << result.status_string();
    return -1;
  }

  result = outgoing_directory.AddUnmanagedProtocol<fidl_examples_routing_echo::Echo>(
      [dispatcher](fidl::ServerEnd<fidl_examples_routing_echo::Echo> server_end) {
        fidl::BindServer(dispatcher, std::move(server_end), std::make_unique<EchoImplementation>());
      });
  if (result.is_error()) {
    FX_LOGS(ERROR) << "Failed to add Echo protocol: " << result.status_string();
    return -1;
  }

  // Component is serving and ready to handle incoming requests
  inspector.Health().Ok();

  return loop.Run();
}
這段程式碼會執行下列步驟,提供 Echo 通訊協定:
- 初始化
ComponentContext,並在傳出目錄的/svc/fidl.examples.routing.echo.Echo下方新增項目。 - 提供目錄,並開始監聽連入連線。
- 將
EchoImplementation執行個體附加為任何相符Echo要求的請求處理常式。
加入下列程式碼,實作通訊協定要求處理常式:
荒漠油廠
echo-server/src/main.rs:
// Handler for incoming service requests
async fn handle_echo_request(mut stream: EchoRequestStream) {
    while let Some(event) = stream.try_next().await.expect("failed to serve echo service") {
        let EchoRequest::EchoString { value, responder } = event;
        responder.send(value.as_ref().map(|s| &**s)).expect("failed to send echo response");
    }
}
EchoRequestStream 中的每項要求都會依方法名稱 (EchoString) 輸入,並包含回應器介面,可傳回傳回值。
C++
echo-server/main.cc:
// Handler for incoming service requests
class EchoImplementation : public fidl::Server<fidl_examples_routing_echo::Echo> {
 public:
  void EchoString(EchoStringRequest& request, EchoStringCompleter::Sync& completer) override {
    completer.Reply({{.response = request.value()}});
  }
};
每個 Echo 通訊協定方法都有對應的覆寫函式 (EchoString()),並包含回呼介面,可傳回傳回值。
這項實作方式只是「回傳」要求中的相同字串值,並將其納入回應酬載。
建立用戶端元件
建立另一個新元件專案,實作回應用戶端。這個元件會連線至通訊協定實作項目並傳送要求。
在 //vendor/fuchsia-codelab 目錄中,為名為 echo-client 的新元件建立專案架構:
mkdir -p vendor/fuchsia-codelab/echo-client在新專案目錄中建立下列檔案和目錄結構:
荒漠油廠
//vendor/fuchsia-codelab/echo-client
                        |- BUILD.gn
                        |- meta
                        |   |- echo.cml
                        |
                        |- src
                            |- main.rs
C++
//vendor/fuchsia-codelab/echo-client
                        |- BUILD.gn
                        |- meta
                        |   |- echo.cml
                        |
                        |- main.cc
在 BUILD.gn 檔案中新增下列建構規則,建構及套件用戶端元件:
荒漠油廠
echo-client/BUILD.gn:
import("//build/components.gni")
import("//build/rust/rustc_binary.gni")


rustc_binary("bin") {
  output_name = "echo-client"
  edition = "2024"
  deps = [
    "//vendor/fuchsia-codelab/echo-fidl:echo_rust",
    "//src/lib/fuchsia",
    "//src/lib/fuchsia-component",
    "//third_party/rust_crates:anyhow",
    "//third_party/rust_crates:log",
  ]

  sources = [ "src/main.rs" ]
}

# Unpackaged component "#meta/echo_client.cm"
fuchsia_component("echo_client_cmp") {
  component_name = "echo_client"
  manifest = "meta/echo_client.cml"
  deps = [ ":bin" ]
}

fuchsia_package("echo-client") {
  package_name = "echo-client"
  deps = [ ":component" ]
}
C++
echo-client/BUILD.gn:
import("//build/components.gni")


executable("bin") {
  output_name = "echo-client"
  sources = [ "main.cc" ]

  deps = [
    "//vendor/fuchsia-codelab/echo-fidl:echo_cpp",
    "//sdk/lib/async-loop:async-loop-cpp",
    "//sdk/lib/async-loop:async-loop-default",
    "//sdk/lib/component/incoming/cpp",
    "//sdk/lib/sys/cpp",
    "//sdk/lib/syslog/cpp",
  ]
}

# Unpackaged component "#meta/echo_client.cm"
fuchsia_component("echo_client_cmp") {
  component_name = "echo_client"
  manifest = "meta/echo_client.cml"
  deps = [ ":bin" ]
}

fuchsia_package("echo-client") {
  package_name = "echo-client"
  deps = [ ":component" ]
}
設定用戶端元件資訊清單,要求伺服器公開的 fidl.examples.routing.echo.Echo 能力:
荒漠油廠
echo-client/meta/echo_client.cml:
{
    include: [
        // Enable logging on stdout
        "syslog/client.shard.cml",
    ],

    // Information about the program to run.
    program: {
        // Use the built-in ELF runner.
        runner: "elf",

        // The binary to run for this component.
        binary: "bin/echo-client",

        // Program arguments
        args: [ "Hello Fuchsia!" ],
    },


    // Capabilities used by this component.
    use: [
        { protocol: "fidl.examples.routing.echo.Echo" },
    ],
}
C++
echo-client/meta/echo_client.cml:
{
    include: [
        // Enable logging.
        "syslog/client.shard.cml",
    ],

    // Information about the program to run.
    program: {
        // Use the built-in ELF runner.
        runner: "elf",

        // The binary to run for this component.
        binary: "bin/echo-client",

        // Program arguments
        args: [ "Hello Fuchsia!" ],
    },


    // Capabilities used by this component.
    use: [
        { protocol: "fidl.examples.routing.echo.Echo" },
    ],
}
實作用戶端
與 echo-args 類似,用戶端會將程式引數做為訊息傳遞至伺服器。在 echo_client.cml 中新增下列程式引數:
荒漠油廠
echo-client/meta/echo_client.cml:
// Information about the program to run.
program: {
    // Use the built-in ELF runner.
    runner: "elf",

    // The binary to run for this component.
    binary: "bin/echo-client",

    // Program arguments
    args: [ "Hello Fuchsia!" ],
},
C++
echo-client/meta/echo_client.cml:
// Information about the program to run.
program: {
    // Use the built-in ELF runner.
    runner: "elf",

    // The binary to run for this component.
    binary: "bin/echo-client",

    // Program arguments
    args: [ "Hello Fuchsia!" ],
},
開啟主要來源檔案,並將匯入陳述式替換為下列程式碼:
荒漠油廠
echo-client/src/main.rs:
use fidl_fidl_examples_routing_echo::EchoMarker;
use fuchsia_component::client::connect_to_protocol;
C++
echo-client/main.cc:
#include <fidl/fidl.examples.routing.echo/cpp/fidl.h>
#include <lib/component/incoming/cpp/protocol.h>
#include <lib/fidl/cpp/string.h>
#include <lib/sys/cpp/component_context.h>
#include <lib/syslog/cpp/log_settings.h>
#include <lib/syslog/cpp/macros.h>

#include <cstdlib>
#include <iostream>
#include <string>
將下列程式碼新增至 main(),連線至 Echo 通訊協定並傳送要求:
荒漠油廠
echo-client/src/main.rs:
#[fuchsia::main]
async fn main() -> Result<(), anyhow::Error> {
    // Parse arguments, removing binary name
    let mut args: Vec<String> = std::env::args().collect();
    args.remove(0);

    // Connect to FIDL protocol
    let echo = connect_to_protocol::<EchoMarker>().expect("error connecting to echo");

    // Send messages over FIDL interface
    for message in args {
        let out = echo.echo_string(Some(&message)).await.expect("echo_string failed");
        log::info!("Server response: {}", out.as_ref().expect("echo_string got empty result"));
    }

    Ok(())
}
EchoMarker 提供包裝函式,可依名稱連線至公開能力,並傳回開啟的 EchoProxy 介面控制代碼。這個 Proxy 包含 echo_string() FIDL 通訊協定方法。
C++
echo-client/main.cc:
int main(int argc, const char* argv[], char* envp[]) {
  // Set tags for logging.
  fuchsia_logging::LogSettingsBuilder builder;
  builder.WithTags({"echo_client"}).BuildAndInitialize();

  // Connect to FIDL protocol
  zx::result client_end = component::Connect<fidl_examples_routing_echo::Echo>();
  if (client_end.is_error()) {
    FX_LOGS(ERROR) << "Failed to connect to Echo protocol: " << client_end.status_string();
    return EXIT_FAILURE;
  }
  fidl::SyncClient client(std::move(client_end.value()));

  // Send messages over FIDL interface for each argument
  fidl::StringPtr response = nullptr;
  for (int i = 1; i < argc; i++) {
    fidl::Result response = client->EchoString({argv[i]});

    if (response.is_error()) {
      FX_LOGS(ERROR) << "echo_string failed: " << response.error_value();
      return EXIT_FAILURE;
    }
    if (!response->response().has_value()) {
      FX_LOGS(ERROR) << "echo_string got empty result";
      return EXIT_FAILURE;
    }
    const std::string& response_value = response->response().value();
    FX_LOG_KV(INFO, "Server response", FX_KV("response", response_value));
  }

  return 0;
}
EchoSyncPtr 提供包裝函式,可依名稱連線至公開能力,並傳回開放 Proxy 介面的控制代碼。這個 Proxy 包含 EchoString() FIDL 通訊協定方法。
整合元件
伺服器提供的功能必須透過元件架構,傳送至用戶端。如要啟用這項功能,請實作領域元件做為父項,並管理能力轉送。
為領域產品定義建立新的專案目錄:
mkdir -p vendor/fuchsia-codelab/echo-realm在新專案目錄中建立下列檔案和目錄結構:
//vendor/fuchsia-codelab/echo-realm
                        |- BUILD.gn
                        |- meta
                        |   |- echo_realm.cml
建立新的元件資訊清單檔案 meta/echo_realm.cml,並加入以下內容:
echo-realm/meta/echo_realm.cml:
{
    // Two children: a server and client.
    children: [
        {
            name: "echo_server",
            url: "#meta/echo_server.cm",
        },
        {
            name: "echo_client",
            url: "#meta/echo_client.cm",
        },
    ],
    offer: [
        // Route Echo protocol from server to client.
        {
            protocol: "fidl.examples.routing.echo.Echo",
            from: "#echo_server",
            to: "#echo_client",
        },

        // Route diagnostics protocols to both children.
        {
            dictionary: "diagnostics",
            from: "parent",
            to: [
                "#echo_client",
                "#echo_server",
            ],
        },
    ],
}
這會建立元件領域,並將伺服器和用戶端做為子項元件,然後將 fidl.examples.routing.echo.Echo 通訊協定能力路由至用戶端。
新增 BUILD.gn 檔案,為領域元件建立建構目標:
echo-realm/BUILD.gn:
import("//build/components.gni")

fuchsia_component("echo_realm") {
  manifest = "meta/echo_realm.cml"
}

fuchsia_package("echo-realm") {
  deps = [
    ":echo_realm",
    "//vendor/fuchsia-codelab/echo-server:component",
    "//vendor/fuchsia-codelab/echo-client:component",
  ]
}
更新建構設定,加入新元件:
fx set workstation_eng.x64 \
    --with //vendor/fuchsia-codelab/echo-server \
    --with //vendor/fuchsia-codelab/echo-client \
    --with //vendor/fuchsia-codelab/echo-realm
再次執行 fx build,建構元件:
fx build將元件新增至拓撲
您會將元件新增至 ffx-laboratory,這是用於產品核心領域內開發作業的受限集合。集合可讓元件在執行階段動態建立及銷毀。
將 echo-realm 元件網址和 ffx-laboratory 內的適當路徑名稱傳遞至 ffx component create,即可建立元件執行個體:
ffx component create /core/ffx-laboratory:echo-realm \
    fuchsia-pkg://fuchsia.com/echo-realm#meta/echo_realm.cm
然後,使用 ffx component resolve 解析 echo-realm 元件:
ffx component resolve /core/ffx-laboratory:echo-realm確認伺服器和用戶端例項也已使用 ffx component show 建立為子項元件:
ffx component show echo Moniker: /core/ffx-laboratory:echo-realm/echo_client
URL: #meta/echo_client.cm
Type: CML static component
Component State: Unresolved
Execution State: Stopped
Moniker: /core/ffx-laboratory:echo-realm/echo_server
URL: #meta/echo_server.cm
Type: CML static component
Component State: Unresolved
Execution State: Stopped
Moniker: /core/ffx-laboratory:echo-realm
URL: fuchsia-pkg://fuchsia.com/echo-realm#meta/echo_realm.cm
Type: CML dynamic component
Component State: Resolved
Execution State: Stopped
Merkle root: 666c40477785f89b0ace22b30d65f1338f1d308ecceacb0f65f5140baa889e1b
驗證元件互動
使用 ffx component start 啟動現有的用戶端元件執行個體:
ffx component start /core/ffx-laboratory:echo-realm/echo_client開啟另一個終端機視窗,並驗證用戶端元件的記錄輸出內容:
ffx log --filter echo裝置記錄中應會顯示下列輸出內容:
[echo_client][I] Server response: Hello, Fuchsia!
用戶端連線至 fidl.examples.routing.echo.Echo 能力後,伺服器元件就會啟動,並持續執行以處理其他 FIDL 要求。
使用 ffx component show 查看元件執行個體樹狀結構中執行的 Echo 伺服器:
ffx component show echo_server Moniker: /core/ffx-laboratory:echo-realm/echo_server
URL: #meta/echo_server.cm
Type: CML static component
Component State: Resolved
Incoming Capabilities: fuchsia.logger.LogSink
Exposed Capabilities: diagnostics
fidl.examples.routing.echo.Echo
Execution State: Running
Job ID: 474691
Process ID: 474712
Running for: 2026280474361 ticks
Merkle root: 666c40477785f89b0ace22b30d65f1338f1d308ecceacb0f65f5140baa889e1b
Outgoing Capabilities: diagnostics
fidl.examples.routing.echo.Echo
終止執行個體
使用下列指令清理 echo-realm 執行個體:
ffx component destroy /core/ffx-laboratory:echo-realm