集成测试场景涉及运行 同一领域和交换功能。虽然大多数测试都是单元测试 仅跨越单个组件的测试,集成测试场景需要 定义领域拓扑和功能路由。
测试运行程序框架集成
集成测试组件与测试运行程序框架集成,具体方法是 包含与支持的语言特定测试框架匹配的测试运行程序分片。
Rust
include: [
    "//src/sys/test_runners/rust/default.shard.cml",
    "syslog/client.shard.cml",
],

// Information about the program to run.
program: {
    // The binary to run for this component.
    binary: "bin/echo_integration_test_rust",
},
C++
include: [
    "//src/sys/test_runners/gtest/default.shard.cml",
    "inspect/offer.shard.cml",
    "syslog/client.shard.cml",
],

// Information about the program to run.
program: {
    // The binary to run for this component.
    binary: "bin/echo_integration_test_cpp",
},
此分片提供两个关键元素:
- 公开了框架所需的
fuchsia.test.Suite协议 发现和执行测试用例。 - 将程序
runner设置为为指定测试提供的测试运行程序 框架。
测试领域拓扑
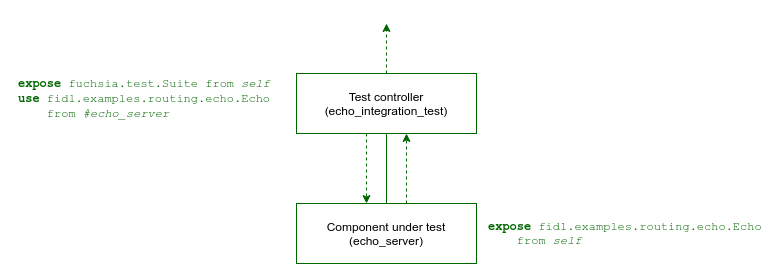
集成测试组件使用 作为父项。这样,测试控制器就能够负责 被测组件及其依赖项之间的功能路由。
以下是用于对 echo_server 进行集成测试的拓扑示例
组件:

这是一个简单的测试领域,会绑定到 fidl.examples.routing.echo.Echo
echo_server组件公开的协议。
echo_integration_test 软件包包含以下组件:
- echo_integration_test - 测试控制器组件
- echo_server - 被测组件
您可以通过以下方式定义测试领域拓扑:
- Realm Builder:使用 Realm Builder 动态在代码中 库。
- 组件清单:静态使用组件清单 (简称 CML)。
您可以参考下表来确定哪种方法最适合您的集成测试:
| 集成测试用例 | 大区构建器 | 静态 CML |
|---|---|---|
| 使用静态依赖项的简单集成测试 | ||
| 每个测试用例的唯一组件实例 | ||
| 被测组件绑定到每个测试用例的生命周期 | ||
| 被测组件的动态虚构、模拟和桩实例 | ||
| 测试用例之间的动态路由和配置 |
大区构建器
如果需要在运行时定义领域拓扑,或需要 需要替换为本地模拟实现,您可以使用 Realm Builder 库在您的测试代码中动态创建拓扑。
测试控制器组件的清单包含使用 其组件清单分片:
Rust
include: [
    "sys/component/realm_builder.shard.cml",
    // ...
],
C++
include: [
    "sys/component/realm_builder.shard.cml",
    // ...
],
测试控制器代码构造测试领域拓扑,将 echo_server 添加为
子组件并声明必要的功能路由回父组件:
Rust
use {
    // ...
    fuchsia_component_test::{
        Capability, ChildOptions, LocalComponentHandles, RealmBuilder, Ref, Route,
    },
    futures::{StreamExt, TryStreamExt},
};

// ...

let builder = RealmBuilder::new().await?;

// Add component to the realm, which is fetched using a URL.
let echo_server = builder
    .add_child(
        "echo_server",
        "fuchsia-pkg://fuchsia.com/realm-builder-examples#meta/echo_server.cm",
        ChildOptions::new(),
    )
    .await?;

builder
    .add_route(
        Route::new()
            .capability(Capability::protocol_by_name("fidl.examples.routing.echo.Echo"))
            .from(&echo_server)
            .to(Ref::parent()),
    )
    .await?;
C++
#include <lib/sys/component/cpp/testing/realm_builder.h>

// ...

RealmBuilder builder = RealmBuilder::Create();

// Add component server to the realm, which is fetched using a URL.
builder.AddChild("echo_server",
                 "fuchsia-pkg://fuchsia.com/realm-builder-examples#meta/echo_server.cm");

builder.AddRoute(Route{.capabilities = {Protocol{.name = "fidl.examples.routing.echo.Echo"}},
                       .source = ChildRef{"echo_server"},
                       .targets = {ParentRef()}});
测试控制器代码通过 capability 与 echo_server 进行交互
创建的大区:
Rust
let realm = builder.build().await?;

let echo: fecho::EchoProxy = realm.root.connect_to_protocol_at_exposed_dir()?;
assert_eq!(echo.echo_string(Some("hello")).await?, Some("hello".to_owned()));
C++
RealmRoot realm = builder.Build(dispatcher());

zx::result<fidl::ClientEnd<fidl_examples_routing_echo::Echo>> client_end =
    realm.component().Connect<fidl_examples_routing_echo::Echo>();
ASSERT_FALSE(client_end.is_error()) << client_end.status_string();
fidl::SyncClient echo_client(std::move(*client_end));

fidl::Result<::fidl_examples_routing_echo::Echo::EchoString> result =
    echo_client->EchoString({"hello"});
ASSERT_EQ(result->response(), "hello");
如需全面了解如何使用 Realm Builder 实现测试,请参阅 Realm Builder 开发者指南。
组件清单
如果测试中的所有组件均为静态组件,您可以定义整个拓扑 在测试控制器的组件清单中使用 CML 对测试领域进行声明。
测试控制器组件的清单静态声明 echo_server
作为子项进行测试的组件,并将必要的功能传回
父级:
Rust
{
    include: [
        "//src/sys/test_runners/rust/default.shard.cml",
        "syslog/client.shard.cml",
    ],

    // Information about the program to run.
    program: {
        // The binary to run for this component.
        binary: "bin/echo_integration_test_rust",
    },


    // Child components orchestrated by the integration test.
    children: [
        {
            name: "echo_server",
            url: "#meta/echo_server.cm",
        },
    ],

    // Capabilities used by this component.
    use: [
        {
            protocol: [ "fidl.examples.routing.echo.Echo" ],
            from: "#echo_server",
        },
    ],

    // Capabilities required by components under test.
    offer: [
        {
            dictionary: "diagnostics",
            from: "parent",
            to: "#echo_server",
        },
    ],
}
C++
{
    include: [
        "//src/sys/test_runners/gtest/default.shard.cml",
        "inspect/offer.shard.cml",
        "syslog/client.shard.cml",
    ],

    // Information about the program to run.
    program: {
        // The binary to run for this component.
        binary: "bin/echo_integration_test_cpp",
    },


    // Child components orchestrated by the integration test.
    children: [
        {
            name: "echo_server",
            url: "#meta/echo_server.cm",
        },
    ],

    // Capabilities used by this component.
    use: [
        {
            protocol: [ "fidl.examples.routing.echo.Echo" ],
            from: "#echo_server",
        },
    ],
}
测试控制器代码通过公开提供的 echo_server 与它进行交互
功能:
Rust
use anyhow::Error;
use fidl_fidl_examples_routing_echo as fecho;
use fuchsia_component::client;

#[fuchsia::test]
async fn echo_integration_test() -> Result<(), Error> {
    const ECHO_STRING: &str = "Hello, world!";

    let echo = client::connect_to_protocol::<fecho::EchoMarker>()
        .expect("error connecting to echo server");
    let out = echo.echo_string(Some(ECHO_STRING)).await.expect("echo_string failed");

    assert_eq!(ECHO_STRING, out.unwrap());
    Ok(())
}
C++
#include <fidl/examples/routing/echo/cpp/fidl.h>
#include <lib/fidl/cpp/string.h>
#include <lib/sys/cpp/component_context.h>

#include <string>

#include <gtest/gtest.h>

TEST(EchoIntegrationTest, TestEcho) {
  ::fidl::examples::routing::echo::EchoSyncPtr echo_proxy;
  auto context = sys::ComponentContext::Create();
  context->svc()->Connect(echo_proxy.NewRequest());

  ::fidl::StringPtr request("Hello, world!");
  ::fidl::StringPtr response = nullptr;
  ASSERT_TRUE(echo_proxy->EchoString(request, &response) == ZX_OK);
  ASSERT_TRUE(request == response);
}
测试软件包
所有被测组件都包含在同一个封闭测试软件包中。 这有助于提升在不同环境中运行和更新测试的能力 而无需考虑依赖项无法同步的问题。
请参阅以下 BUILD.gn 文件,其中定义了此示例的 fuchsia_test_package() 目标:
Rust
rustc_test("bin") {
  name = "echo_integration_test_rust"
  edition = "2024"

  deps = [
    "//examples/components/routing/fidl:echo_rust",
    "//src/lib/fuchsia",
    "//src/lib/fuchsia-component",
    "//third_party/rust_crates:anyhow",
  ]

  sources = [ "src/lib.rs" ]
}


fuchsia_component("echo_integration_test_component") {
  testonly = true
  component_name = "echo_integration_test"
  manifest = "meta/echo_integration_test.cml"
  deps = [ ":bin" ]
}


fuchsia_test_package("echo_integration_test_rust") {
  test_components = [ ":echo_integration_test_component" ]
  deps = [ "//examples/components/routing/rust/echo_server:echo_server_cmp" ]
}
C++
executable("bin") {
  output_name = "echo_integration_test_cpp"
  sources = [ "echo_integration_test.cc" ]
  deps = [
    "//examples/components/routing/fidl:echo_hlcpp",
    "//sdk/lib/async-loop:async-loop-cpp",
    "//sdk/lib/async-loop:async-loop-default",
    "//sdk/lib/sys/cpp",
    "//sdk/lib/sys/cpp/testing:unit",
    "//src/lib/fxl/test:gtest_main",
    "//third_party/googletest:gtest",
  ]
  testonly = true
}


fuchsia_component("echo_integration_test_component") {
  testonly = true
  component_name = "echo_integration_test"
  manifest = "meta/echo_integration_test.cml"
  deps = [ ":bin" ]
}


fuchsia_test_package("echo_integration_test_cpp") {
  test_components = [ ":echo_integration_test_component" ]
  deps = [ "//examples/components/routing/cpp/echo_server:echo_server_cmp" ]
}
使用以下变量将组件内置到 fuchsia_test_package() 中:
test_components:包含公开fuchsia.test.Suite协议的测试的组件。deps:集成测试所需的其他组件依赖项。
如需了解详情,请参阅测试软件包 GN 模板。
测试组件名称
组件的名称用于标识组件拓扑中的唯一实例。
对于在测试拓扑中运行的组件,名称路径是相对于
测试领域中的根组件。在上面的示例中,根组件是
公开 fuchsia.test.Suite 协议的测试控制器组件。
子名称格式取决于您的测试领域拓扑:
- 静态 CML:以静态方式声明为根测试控制器的子项的组件
只是由其组件
name标识。 - Realm Builder:Realm Builder 引入了 测试控制器和子组件。如需详细了解测试组件 Realm Builder 的名称,请参阅 Realm Builder 开发者指南。
