This guide provides instructions on how to install Fuchsia on an Intel NUC (Next Unit of Computing) device.
The steps are:
- Prerequisites.
- Build Fuchsia.
- Prepare a USB drive.
- Enable EFI booting on the NUC.
- Install Fuchsia on the NUC.
- (Optional) Upload Fuchsia SSH keys to the NUC.
Prerequisites
Before you start installing Fuchsia on a NUC device, make sure that you've completed the following tasks:
Set up the Fuchsia development environment
To set up the Fuchsia development environment on your workstation, complete the Get started with Fuchsia guide.
Get parts
The following parts are required for this guide:
- A NUC device (see example models)
- A USB 3.0 flash drive
- A keyboard
- A mouse (Optional)
- A monitor with an HDMI port
- An HDMI cable
- An Ethernet cable
- A Phillips-head screwdriver (with a magnetic tip)
Build Fuchsia
Installing Fuchsia on a NUC device requires that you build an x64 image and generate build artifacts (which include the Fuchsia installer) on your workstation.
To build Fuchsia for NUC installation, do the following:
Set your build configuration to an x64 target and include the
recovery-installerpackage.fx set core.x64 --with //build/images/recovery:recovery-installerBuild Fuchsia:
fx buildBuilding Fuchsia can take up to 90 minutes.
Prepare a USB drive
You need to prepare a bootable USB drive that runs the Fuchsia installer. Later in the Install Fuchsia on the NUC section, you will use this USB drive to boot your NUC into the Fuchsia installer.
To prepare a bootable USB drive, do the following:
Plug the USB drive into your workstation.
Identify the path to the USB drive:
fx list-usb-disksThis command prints output similar to the following:
$ fx list-usb-disks
/dev/sda - My Example USB Disk
Create a bootable USB drive:
fx mkinstaller -v PATH_TO_USB_DRIVEReplace
PATH_TO_USB_DRIVEwith the path to the USB drive from the step above.The example command below selects the
/dev/sdapath:$ fx mkinstaller -v /dev/sdaWhen finished, the command prints output similar to the following in the end:
$ fx mkinstaller -v /dev/sda
mkinstaller: WARNING: Changing ownership of /dev/sda to alice
[sudo] password for alice:
...
mkinstaller: INFO:    Writing image fvm.sparse.blk to partition storage-sparse...
mkinstaller: INFO:      Wrote 835.6M in 35.55s, 23.5M/s
mkinstaller: INFO: Done.
mkinstaller: INFO: Ejected USB disk
Unplug the USB drive from the workstation.
Enable EFI booting on the NUC
Update your NUC's BIOS setup so that it can boot from a USB drive.
Two versions of BIOS are available on NUC devices: Visual BIOS (for instance, NUC7) and Aptio V BIOS (for instance, NUC11). The steps are slightly different depending on which BIOS is included in your system.
Visual BIOS
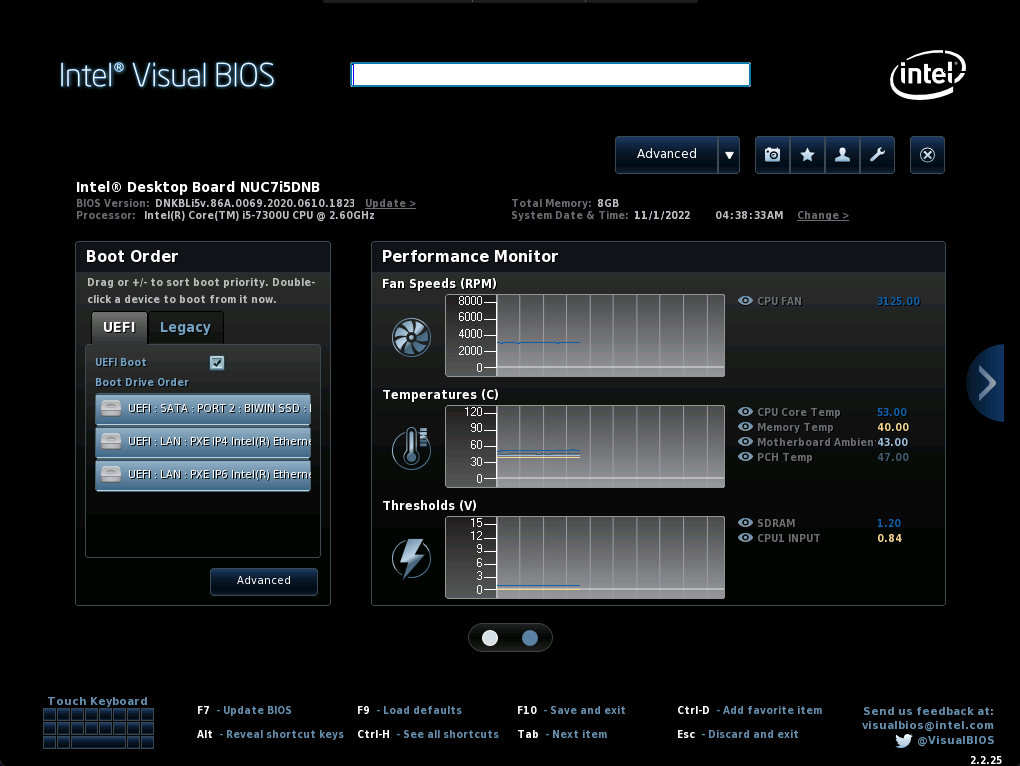
Figure 1. A screenshot of Visual BIOS
To enable EFI (Extensible Firmware Interface) booting on your NUC, do the following:
- Reboot your NUC.
- To enter the BIOS setup, press
F2while booting. - Click the Advanced button at the top.
- Click the Boot tab.
Click the Boot Priority tab and confirm the following settings:
- UEFI Boot is checked.
- Legacy Boot is unchecked.

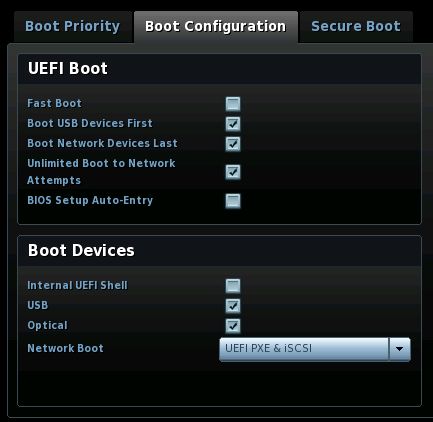
Click the Boot Configuration tab and confirm the following settings:
In the UEFI Boot window:
- Boot USB Devices First is checked.
- Boot Network Devices Last is checked.
- Unlimited Network Boot Attempts is checked.
In the Boot Devices window:
- USB is checked.
- Network Boot is set to
UEFI PXE & iSCSI.
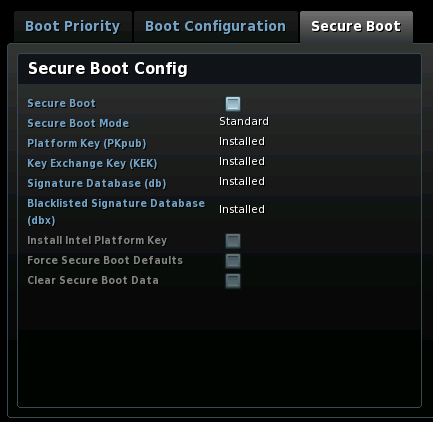
Click the Secure Boot tab and confirm the following settings:
- Secure Boot is unchecked.
To save and exit BIOS, press
F10and click Yes.
Aptio V BIOS
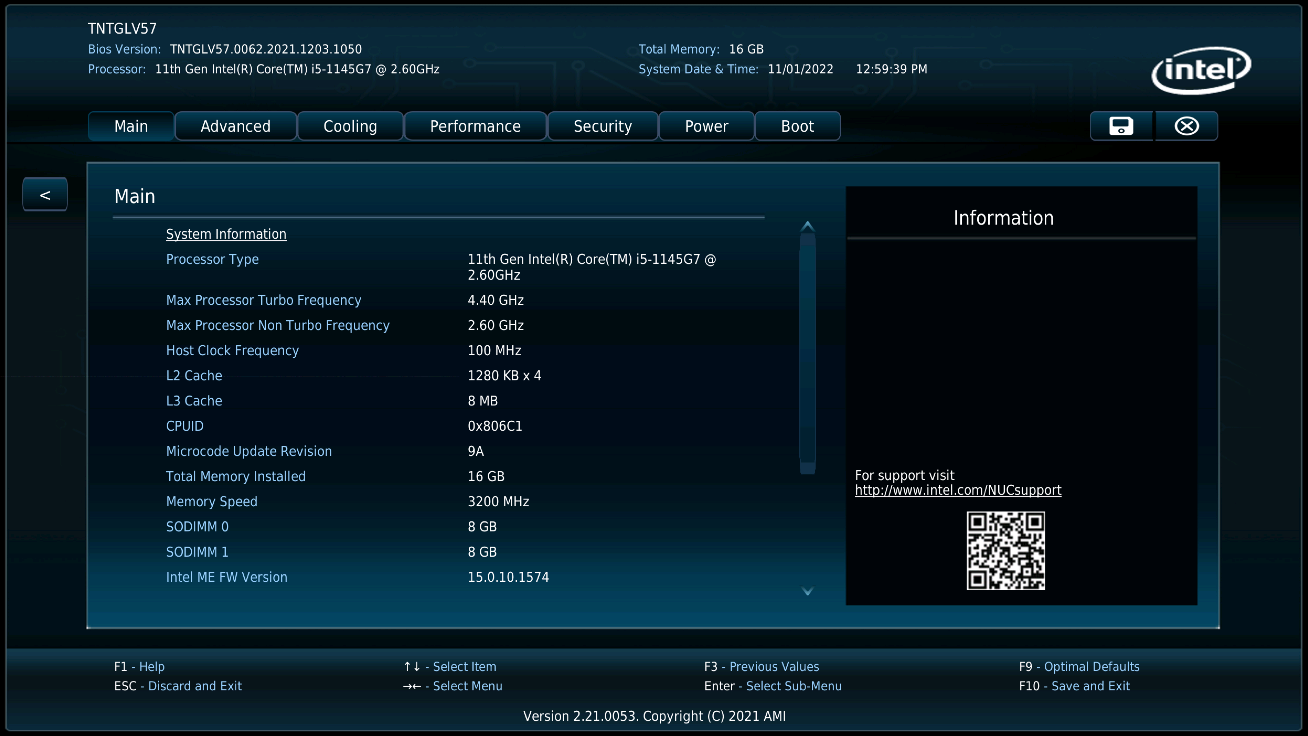
Figure 2. A screenshot of Aptio V BIOS
To enable EFI (Extensible Firmware Interface) booting on your NUC, do the following:
- Reboot your NUC.
- To enter the BIOS setup, press
F2while booting. - Click the Boot tab.
Click Secure Boot and confirm the following settings:
- Secure Boot is set to
Disabled.
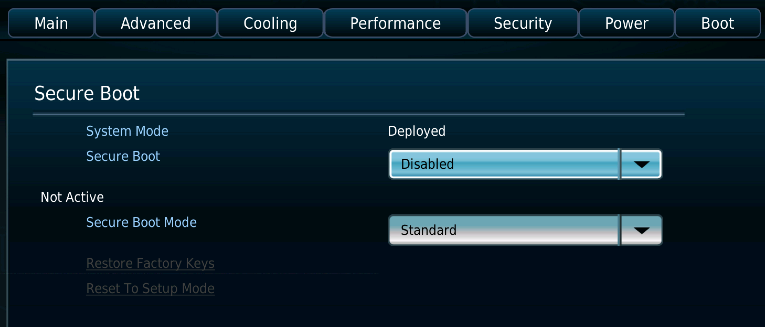
- Secure Boot is set to
To return, click the < button on the left.
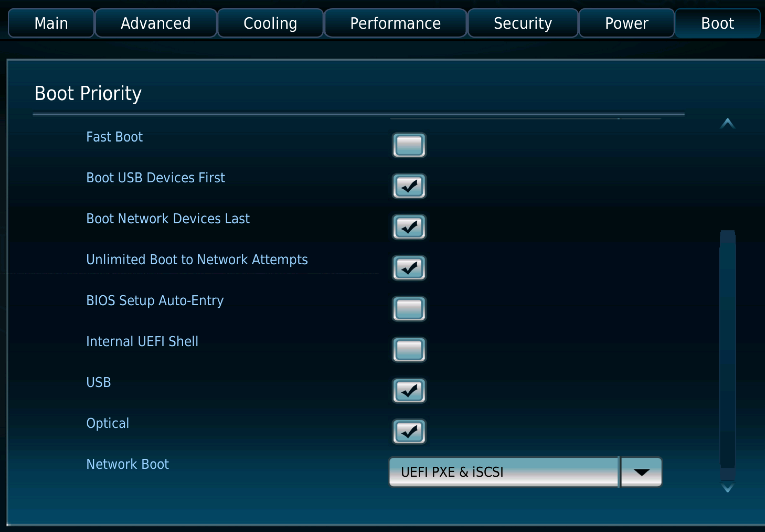
Click Boot Priority and confirm the following settings:
- UEFI Boot is checked.
Legacy Boot is unchecked.
Boot USB Devices First is checked.
Boot Network Devices Last is checked.
Unlimited Boot to Network Attempts is checked.
USB is checked.
Network Boot is set to
UEFI PXE & iSCSI.
To save and exit BIOS, press
F10and click Ok.
Install Fuchsia on the NUC
Use the bootable USB drive to boot your NUC into the Fuchsia installer. It then installs the x64 image (which was built in the Build Fuchsia section) to the NUC.
To install Fuchsia on your NUC, do the following:
Plug the bootable USB drive into the NUC.
Reboot your NUC.
The NUC boots into the Fuchsia Installer (with a pink background).
Press Enter to select the
Install from USBoption.Press Enter on other prompts to continue.
Once the installation completes, unplug the USB drive from the NUC device.
Reboot the NUC device.
The NUC is now booted into Fuchsia.
(Optional) Upload Fuchsia SSH keys to the NUC
If you plan on using this NUC device for Fuchsia development, you need
to flash a Fuchsia image to the NUC device from your host machine, which
in turn uploads the Fuchsia-specific SSH keys to the NUC.
Once those Fuchsia-specific SSH keys are uploaded to the NUC, you can perform
ffx-based workflows on the NUC from your host machine.
To upload Fuchsia SSH keys to the NUC, do the following:
Complete the steps in the Flash a new Fuchsia image to the NUC section in Appendices.
To verify that you can connect to the NUC from the host machine, run the following command:
ffx target showThis command prints output similar to the following:
$ ffx target show
Target:
    Name: "fuchsia-54b2-0389-644b"
    SSH Address: "fe81::55b1:2ff2:fe34:567b%en10:22"
Board:
    Name: "default-board"
    Revision: "1"
    Instruction set: "x64"
...
Appendices
Supported NUC models
For GPU support, get a NUC7 (Kaby Lake) or NUC8 (Coffee Lake), or a higher generation.
The list below shows some example models:
- Intel® NUC Kit NUC7i5DNKE
- Intel® NUC Kit NUC7i5DNHE (Best choice)
- Intel® NUC Kit NUC7i3DNKE
- Intel® NUC Kit NUC7i3DNHE
- Intel® NUC Kit NUC8i5BEK
- Intel® NUC Kit NUC8i5BEH
- Intel® NUC Kit NUC8i3BEK
- Intel® NUC Kit NUC8i3BEH
Flash a new Fuchsia image to the NUC
Once a NUC is running Fuchsia, you can use Fuchsia's flashing mechanism to provision a new Fuchsia image to the NUC.
To flash a Fuchsia image to your NUC, do the following:
Connect the NUC directly to the workstation using an Ethernet cable.
(Or you can also connect the NUC to a router or WiFi modem in the same Local Area Network as the workstation.)
Reboot your NUC.
On Fuchsia's boot screen, press the
fkey to select thefastbootoption.Once the NUC is in Fastboot mode, it prints
Fastboot TCP is readyon the screen.On your workstation, discover the NUC in Fastboot mode:
ffx target listThis command prints output similar to the following:
$ ffx target list
NAME                      SERIAL       TYPE       STATE       ADDRS/IP                           RCS
fuchsia-54b2-0389-644b    <unknown>    Unknown    Fastboot    [fe81::55b1:2ff2:fe34:567b%en10]    N
Verify that the device's state is
Fastboot.Flash a new Fuchsia image to the NUC:
fx flashIf you have multiple devices connected to the host machine previously, you may need to explicitly specify the name of the NUC device, for example:
fx flash -s fuchsia-54b2-0389-644bWhen finished, the NUC reboots and starts running the new Fuchsia image.
Remote management of NUC devices
To enable remote management, including KVM, you need to configure Intel AMT (Active Management Technology).
First, configure Intel ME on your NUC:
- Reboot your NUC.
- Enter Intel ME settings by pressing
Ctrl+Pon the boot screen. - Select MEBx Login
Set up a new password, the default one is
admin.Configure network:
- Select Intel(R) AMT Configuration.
Unconfigure existing network settings:
- Select Unconfigure Network Access
- Select Full Unprovision
- Press
Yto confirm.
Select Network Setup > TCP/IP Settings > Wired LAN IPV4 Configuration.
Set DHCP Mode to Disabled.
Set IPV4 Address to an address reachable from your host machine via the EdgeRouter.
On your host machine, run
ifconfigand find the entry that corresponds to the EdgeRouter, for example:$ ifconfig enx00e04c0c13ba: flags=4163<UP,BROADCAST,RUNNING,MULTICAST> mtu 1500 inet 192.168.42.86 netmask 255.255.255.0 broadcast 192.168.42.255 ...In this case, you could try using the address 192.168.42.20
Set Subnet Mask Address to the netmask of your host machine to EdgeRouter connection, for example 255.255.255.0.
Press
Escuntil you return to Intel(R) AMT Configuration.Select Activate Network Access and press
Yto confirm.Exit Intel ME settings and save your changes.
Now, configure the amtctrl command-line utility on your host machine:
These instructions assume you have set some environment variables:
AMT_HOST: The IPv4 address you configured in the Intel ME settings.AMT_PASSWORD: The password you chose for Intel ME.VNC_PASSWORD: A password for accessing the NUC over VNC.
Clone the
amtctrlrepository:git clone https://github.com/sdague/amtInstall
amtctrl:cd amt && sudo ./setup.py installConfigure NUC IP address and passwords:
amtctrl set -V $VNC_PASSWORD nuc $AMT_HOST $AMT_PASSWORDEnable VNC:
amtctrl nuc vnc
Now, you can access the NUC from your host machine using any VNC client by connecting to
the IP address set in AMT_HOST. Enter the password set in VNC_PASSWORD when prompted.
You can also turn on, turn off or reboot the NUC with the following terminal commands:
To turn on the NUC:
amtctrl nuc onTo turn off the NUC:
amtctrl nuc offTo reboot the NUC:
amtctrl nuc reboot
