

本指南将介绍在 Fuchsia SDK 开发环境(使用 Bazel 构建系统)中创建新绑定库的相关任务。
在 Fuchsia 驱动程序开发中,绑定库可轻松协调以下任务:
Fuchsia SDK 包含一组绑定库,您可以使用这些库为驱动程序编写绑定规则。不过,有时仅使用现有绑定库可能不足以针对驱动程序编写精确的构建规则。在这种情况下,您可能需要创建一个新的绑定库,以便为驱动程序及其目标节点定义一组自定义绑定属性。
本指南中的开发场景
当新的绑定库可用时,有两个团队(分别承担不同的责任)可能会对使用新的绑定库感兴趣:一个团队负责管理父驱动程序,另一个团队负责处理子驱动程序。
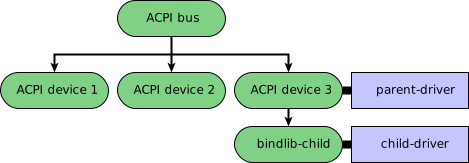
图 1. 显示两个驱动程序之间父子关系的节点拓扑。
图 1 显示了一个包含两个驱动程序的节点拓扑:parent-driver 和 child-driver。现在,假设有这样一个场景:一组平台开发者为 Fuchsia 系统中的内置 ACPI 设备编写了一个驱动程序 (parent-driver),而一组设备开发者正在为新的 ACPI 设备编写一个驱动程序 (child-driver),其目标节点为 bindlib-child。
在这种情况下,会发生以下事件:
创建新的绑定库 - 创建新的绑定库,以便为新的 ACPI 设备定义节点属性。
然后,这两个团队共享这个新的自定义绑定库:
更新父驱动程序的子节点 - 管理
parent-driver的开发者将新的节点属性分配给子节点bindlib-child。更新子驱动程序的绑定规则 - 处理
child-driver的开发者使用新的 节点属性编写绑定规则。
创建新的绑定库
创建一个新的绑定库,使开发者能够精确识别 Fuchsia 系统中的某些目标设备。
如需创建新的绑定库,请执行以下步骤:
1. 编写新的绑定库
编写一个绑定库,用于定义一组新的自定义节点属性。
新的绑定库可能如下所示(请参阅 testlibrary.bind
绑定库示例的 lib 目录中的 ):
library examples.gizmo.bind;

// Include properties from other libraries
using fuchsia.acpi;

// Define new properties and values for this library
string ModelName;

enum GizmoType {
  MEM_64K,
  MEM_128K,
  MEM_256K,
};

// Extend values defined in other libraries
extend uint fuchsia.BIND_PCI_VID {
  GIZMOTRONICS = 0x314159,
};
此新绑定库的名称在顶部以 行定义
library fuchsia.examples.gizmo.bind;。另请注意,行
using fuchsia.acpi;建立了对fuchsia.acpi绑定
库的依赖关系,该库包含在 Fuchsia SDK 中。此设置反映了实际的开发场景,通常需要使用两种类型的绑定库:现有库和自定义库。
2. 为新的绑定库创建构建文件
为新的绑定库创建一个构建文件(即 BUILD.bazel),以便开发者可以自动生成库工件。
以下构建目标在示例绑定库的
BUILD.bazel文件中定义了一个名为
fuchsia.example.gizmo.bind的新 C++ 绑定库:
# This is a bind library that we manually define.
fuchsia_bind_library(
    name = "examples.gizmo.bind",
    srcs = [
        "testlibrary.bind",
    ],
    visibility = ["//visibility:public"],
    deps = [
        "@fuchsia_sdk//bind/fuchsia.acpi",  # An SDK bind library.
    ],
)

# We have to create the C++ library for it manually as well.
fuchsia_bind_cc_library(
    name = "examples.gizmo.bind_cc",
    library = ":examples.gizmo.bind",
    visibility = ["//visibility:public"],
    # Has to have the C++ libraries of all the deps of the bind library.
    deps = [
        "@fuchsia_sdk//bind/fuchsia.acpi:fuchsia.acpi_cc",  # An SDK bind library's C++ lib.
    ],
)
通过构建 fuchsia.example.gizmo.bind library 生成的库工件之一是以下 C++ 头文件(顺便说一句,该文件不包含在示例中):
// Copyright 2022 The Fuchsia Authors. All rights reserved.
// Use of this source code is governed by a BSD-style license that can be
// found in the LICENSE file.

// WARNING: This file is machine generated by bindc.

#ifndef BIND_FUCHSIA_EXAMPLES_GIZMO_BIND_BINDLIB_
#define BIND_FUCHSIA_EXAMPLES_GIZMO_BIND_BINDLIB_

#include <string>

#include <bind/fuchsia/acpi/cpp/bind.h>

namespace bind_fuchsia_examples_gizmo_bind {

static const std::string MODELNAME = "fuchsia.examples.gizmo.bind.ModelName";

static const std::string GIZMOTYPE = "fuchsia.examples.gizmo.bind.GizmoType";
static const std::string GIZMOTYPE_MEM_64K = "fuchsia.examples.gizmo.bind.GizmoType.MEM_64K";
static const std::string GIZMOTYPE_MEM_128K = "fuchsia.examples.gizmo.bind.GizmoType.MEM_128K";
static const std::string GIZMOTYPE_MEM_256K = "fuchsia.examples.gizmo.bind.GizmoType.MEM_256K";

static constexpr uint32_t BIND_PCI_VID_GIZMOTRONICS = 3227993;

}  // namespace bind_fuchsia_examples_gizmo_bind

#endif  // BIND_FUCHSIA_EXAMPLES_GIZMO_BIND_BINDLIB_
开发者现在可以使用此 C++ 头文件中的节点属性来执行以下任务:
更新父驱动程序的子节点
在 Fuchsia 中,某些驱动程序会创建子节点,以便其他驱动程序可以绑定到这些子节点。创建子节点的驱动程序称为父驱动程序。使用新的绑定库时,主要任务是更新父驱动程序的子节点,以便它从新的绑定库接收节点属性。
如需更新父驱动程序的子节点,请执行以下步骤:
1. 在构建文件中添加新的绑定库
更新父驱动程序的构建文件,以包含对新绑定库的依赖关系。
下面的父驱动程序的 BUILD.bazel 文件显示,
cc_binary 目标依赖于自定义绑定库 fuchsia.example.gizmo.bind_cc:
fuchsia_cc_driver(
    name = "parent_driver",
    srcs = [
        "gizmo_server.h",
        "parent-driver.cc",
        "parent-driver.h",
    ],
    deps = [
        # This is a C++ lib from our manually created bind library.
        "//src/bind_library/lib:examples.gizmo.bind_cc",
        # This is a C++ lib from our manually created FIDL based bind library.
        "//src/bind_library/lib:examples.gizmo_bindlib_cc",
        "//src/bind_library/lib:examples.gizmo_cc",
        # This is a C++ lib from an SDK FIDL based bind library.
        "@fuchsia_sdk//fidl/fuchsia.device.fs:fuchsia.device.fs_bindlib_cc",
        "@fuchsia_sdk//pkg/driver_component_cpp",
    ],
)
请注意,依赖项以 //src/bind_library/lib(而不是 @fuchsia_sdk//)为前缀,这表示它来自示例中的本地目录。
2. 将节点属性分配给子节点
更新父驱动程序的源代码,以便将新绑定库中的某些节点属性传递给子节点。
由于 自动生成的 C++ 头文件(来自
新绑定库)包含在 parent-driver.cc 中,因此该驱动程序现在可以从新的绑定库读取
节点属性:
#include <bind/examples/gizmo/bind/cpp/bind.h>
#include <bind/examples/gizmo/cpp/bind.h>
#include <bind/fuchsia/device/fs/cpp/bind.h>

...

properties[0] =
    fdf::MakeProperty(arena, 1 /* BIND_PROTOCOL */, bind_fuchsia_acpi::BIND_PROTOCOL_DEVICE);
properties[1] = fdf::MakeProperty(arena, bind_fuchsia_acpi::HID, "GOOG");
properties[2] = fdf::MakeProperty(arena, bind_examples_gizmo_bind::MODELNAME, "GIZMO3000");
properties[3] = fdf::MakeProperty(arena, bind_examples_gizmo_bind::GIZMOTYPE,
                                  bind_examples_gizmo_bind::GIZMOTYPE_MEM_64K);
请注意,bind_fuchsia_examples_gizmo_bind 命名空间
中的某些字符串变量(请参阅自动生成的 C++ 头文件)用于初始化子节点的节点属性。
更新子驱动程序的绑定规则
绑定到现有驱动程序的子节点的驱动程序称为子驱动程序。 使用新的绑定库时,主要任务是更新子驱动程序的绑定规则,以便使用来自新绑定库的节点属性。其根本目标是为驱动程序编写更精确的绑定规则,以确保它与 Fuchsia 系统中的目标节点匹配。
如需更新子驱动程序的绑定规则,请执行以下步骤:
1. 在构建文件中添加新的绑定库
更新子驱动程序的构建文件,以包含对新绑定库的依赖项
下面的子驱动程序的 BUILD.bazel 文件显示,
fuchsia_driver_bytecode_bind_rules 目标依赖于自定义绑定库
fuchsia.example.gizmo.bind:
fuchsia_driver_bind_bytecode(
    name = "bind_bytecode",
    output = "child-driver.bindbc",
    rules = "child-driver.bind",
    deps = [
        # This bind library is one we created manually.
        "//src/bind_library/lib:examples.gizmo.bind",
        # This bind library is from a FIDL library that we created manually.
        "//src/bind_library/lib:examples.gizmo_bindlib",
        # This bind library is from an SDK FIDL library.
        "@fuchsia_sdk//fidl/fuchsia.device.fs:fuchsia.device.fs_bindlib",
    ],
)
请注意,依赖项以 //src/bind_library/lib(而不是 @fuchsia_sdk//)为前缀,这表示它来自示例中的本地目录。
2. 使用新的节点属性编写绑定规则
编写(或更新)子驱动程序的绑定规则,以使用来自新绑定库的节点属性。
子驱动程序的绑定规则 (child-driver.bind) 显示,规则中使用了自定义绑定库 fuchsia.example.gizmo.bind 中的 ModelName
和 GizmoType 属性来缩小驱动程序的目标设备范围:
using fuchsia.acpi;
using examples.gizmo.bind;

...

fuchsia.BIND_PROTOCOL == fuchsia.acpi.BIND_PROTOCOL.DEVICE;
fuchsia.acpi.hid == "GOOG";
examples.gizmo.bind.ModelName == "GIZMO3000";
examples.gizmo.bind.GizmoType == examples.gizmo.bind.GizmoType.MEM_64K;
如需详细了解绑定规则,请参阅为驱动程序编写绑定规则。
附录
源代码和 SDK 之间绑定库代码生成的差异
绑定库代码生成教程中的大多数概念和示例都适用于 Fuchsia SDK 开发环境。
不过,差异如下:
- 无法在 SDK 中生成 Rust 目标。
- 在 SDK 中,C++ 库目标
cc_library为:{target_name}_cc(而不是:{target_name}_cpp)。 - 如果绑定库未包含在 SDK 中,则需要在
BUILD.bazel中手动添加 C++ 库fuchsia_bind_cc_library的目标。